Priming Raw Linen Instructions
How do I prime a raw linen canvas?
Instructions for Priming Raw Linen Canvas
SUPPLIES
Postal scale
Large Glass pot
Wooden spoon
Cake Knife (the sharp end turned up so it doesn’t leave scrape marks in the canvas)
Long painting knife, about 4 inches long and ½ inch wide
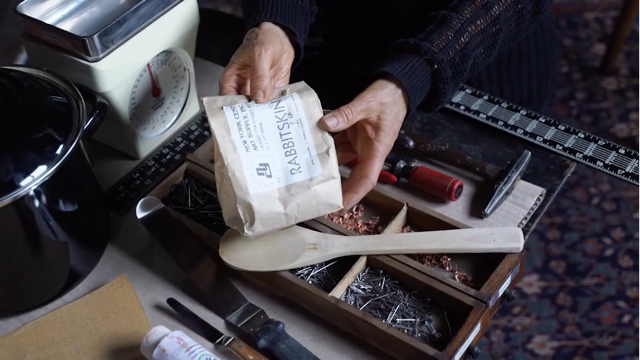
1 ½ oz. Rabbit Skin Glue, granules or sheet (sheet is preferable)
51 oz. of filtered water
Fine sand paper
Large Can of Pure White Lead (Cremnitz, Silver and Flake White are alternates)
Pure Spirits of Gum Turpentine

First, measure both water and rabbit skin glue by weight and soak the glue in the water overnight. Heat the glue over a low heat until it dissolves. Do not let the mixture boil! Place it in the refrigerator overnight.
In the meantime, stretch the canvases you will be priming, or stretch one large canvas (I have a 9-foot long by 52-inch wide stretcher for this—when I have finished priming the canvas and it has fully cured for two weeks, I roll the finished canvas–with the paint layer out to prevent cracking–to be cut into individual canvases later). Stretch the canvases fairly firmly, but not overly so, as the glue will make the canvas as tight as a drum. If you stretch it too tightly, it may bow the stretcher bars. You’ll get the feel for it very quickly. After the glue has gelled, press into the canvas with the cake knife. Initially the canvas will loosen considerably, then it will tighten. Remove excess. Let dry, preferably overnight. Sand lightly. Repeat the same process with a second coat.
Mix a little bit of turpentine with the white lead until it is no longer stiff and will go on smoothly. Apply with the cake knife, pressing the paint into the surface of the canvas. Take off excess with the cake knife then use the smaller knife to remove extra paint. Change directions (along the weft, the warp, and diagonally across the canvas) until the surface is smooth when seen from a low vantage point (lower your eye level to see the canvas in a raking light so that any aberration can be detected). Then, if necessary, fine-tune the surface with the painting knife in a circular motion. There should be no ridges. Let this dry to the touch.
Repeat these directions for a second coat. For the third and final coat, I add a little bit of Maroger to thin the white lead. Apply it as before, pressing into the surface and taking off the excess with the painting knife. The surface should be smooth. I am experimenting with using a squeegee to take off the paint, which you might try. The final look should still show the weave of the canvas without the ‘holes.’ The goal is to level the canvas by filling in the holes. Let dry for two weeks. Sand outside with a particle mask on before painting on it. Use a wet paper towel to take off the powdered white lead. Be very careful when sanding the white lead. The possibility of lead poisoning is greatest when white lead is in powder form!

SHORT CUT
Buy lead double-primed linen and put on the final coat and sand as described above.
For more of the process watch a film of Sherrie McGraw priming canvas!

Leave a Reply
You must be logged in to post a comment.